Showing posts with label Design Project. Show all posts

Monday, September 19, 2011

All Decked Out!


Over the summer we conquered a few home renovations. One of them was updating the deck and creating more privacy in our backyard.

Our house is sandwiched between a tall apartment building and an old, unpleasant-looking house. We never spent much time in our backyard because we felt watched by people in the apartment building, it was awkward because the apartment door is literally 5 feet away from our deck, and the next door neighbors backyard is in slight disrepair... (i.e. weeds, rotten patio furniture, garbage bags, etc.).

Well, you can't move the apartment building or force your neighbors to take care of their yard - so what did we do?.... we BLOCKED them out! We removed all the railings on the deck, and a set of steps on the side of the deck. We built two tall privacy walls on each side and updated the hand railings. Finally, we replaced some rotten boards on the deck floor and gave it a fresh coat of paint.


Special thanks to my wonderful father for building all the railings and privacy fences, making this pretty simple renovation (for me). :)

Wait a second, I almost forgot... While updating the deck, we thought it was a great opportunity to replace a few rotten boards on the front porch and give it a new coat of paint. Just painting the front porch really cleaned up the house and made it look young again. To help with the curb appeal, we removed some dead branches from the neighbors tree that were creeping onto our yard, and power washed the front walkway. This is our beautiful dollhouse we call HOME!


As usual, there is always more you can do to make it perfect. Here is my updated Exterior To Do List:

1. Paint the front door... not sure what color yet but I am thinking a red/burgundy to match the accents on the house.
2. Plant some more flowers in the front yard.... this year I was a terrible gardner... as you can see.
3. Plant a clematis near the new privacy walls. This way in a few years the walls will be covered with beautiful flowers.
4. Buy a moveable fire pit for the backyard. Just because I love fire pits :)
5. Install a clear mesh on the garage for my baby clematis to continue to grow.
6. Buy an outdoor storage bench for all my gardening tools and patio furniture.
7. Install a concrete pad next to the garage for additional parking.
8. Paint the fence white.
9. Replace the side gate.

You're probably saying to yourself, "Wow you must be crazy - that's a lot of stuff to do!". Well, you're probably right - but with some blood, sweat, and LOVE it will get done!

~meg xoxo

Wednesday, March 2, 2011

Fabric + Inspiration = Color Direction

Whenever I am deciding on a direction for a design, I always look for inspiration in either textiles, artwork, or nature. If you already love something why not pull from that element to create the foundation for your design. 

Here, I am using some fabrics to create a color scheme for a friends home.


As you can see I ended up with a lot of different colors. The reason I did this was because I could then create a couple different color scheme using all of these colors. For example, I can create a vivid, energetic scheme with the brighter colors or I can create a earthy, relaxed scheme with the softer more neutral colors. 
~

Sunday, January 30, 2011

Hidden Treasures...


One of my favorite things is shopping at antique malls and flea markets. I love the aspect of "hunting" through other peoples' "junk" and creating something truly unique and special out of it.

I spent Saturday morning with my Dad at the Strathcona Antique Mall. If you haven't been there you must go - it's one of the best antique stores I have been to. The main reason I went was to find some vintage window frames. I didn't end up finding the right window frame, however, I did find some other unique hidden treasures. 

I saw an old railing piece that was in a pile of old wood scraps. It caught my eye because it was a pale yellow and had a great texture. I was really drawn to this piece and thought, "What can I do with this...", and with a little bit of thinking I decided it would make a great magazine rack! So I rotated the railing 90 degrees and leaned it against the wall and created a unique vintage magazine rack. It could also be used as a towel rack in a bathroom or a drying rack for your delicate laundry.


Living in a 900 square foot house, I am always looking for unique storage solutions. I found a vintage wooden box and thought that it would be great in my living room for storing yarn and all my knitting goods. I like the idea of pairing a modern and vintage piece together, so I decided it would be perfect under my black modern side table.


Happy treasure hunting - yarrr! :)
~ Megan

Saturday, December 11, 2010

My First Craft Sale!


Last weekend Jenna Nutting and myself took part in the Westmount Community “Shop the Hall” craft sale.
We shared a table and had a variety of homemade items on display. The items I was selling included: jewelry trees, button & stone earrings, fridge magnets, knitted coffee sleeves, and holiday dog collars.
Jenna was selling a bunch of knitted items, including cowels, baby boots, scarfs, toques, fingerless gloves, and neck warmers. The baby boots were adorable and were loved by everyone!
Overall, the event was a success! We had a great time, met some talented people, and learnt a lot.
Thanks to everyone who stopped by, we appreciate your support!


If you are interested in seeing and / or purchasing any of the items Jenna was selling, you can contact her at jenna.nutting@gmail.com


For any of my merchandise, contact me at myshoeboxdesign@gmail.com

Thursday, November 4, 2010

Design Project:
Bathroom Renovations


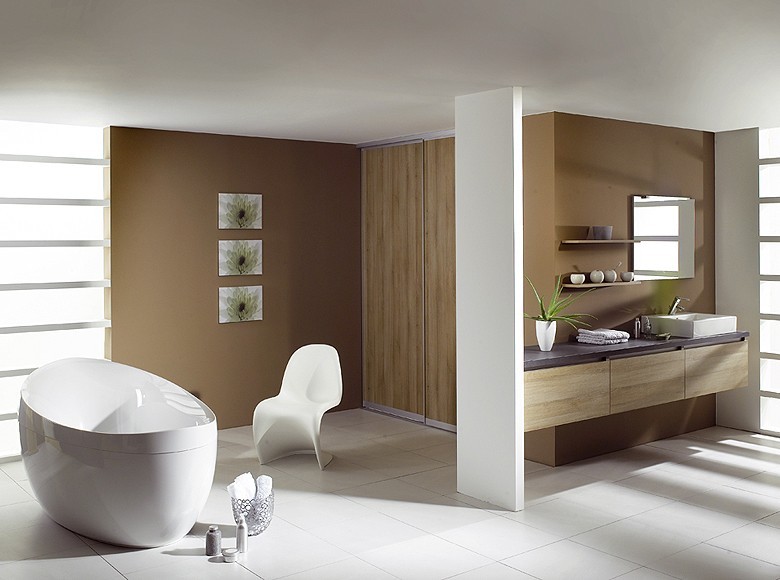
I was asked by a partner at the firm to conceptualize a modern design for his home bathroom. Modern styles are naturally fresh, clean, and simple, and the goal was to apply these elements to a design scheme that reflects nature. The dark wood cabinets represent trees, the ceramic tile represents stone, and the glass sink and light coloured walls represent air.

Here are a few pictures of the presentation board:


Here are some pictures that inspired me while creating this design. Some of them actually made it on the presentation board, while other are more just for fun and were inspiring in a less obvious way.


Enjoy!  :)

Saturday, October 30, 2010

Shoestring Budget: Kitchen Renovations


I live in a 700 square foot house that was built in the 1940s. Although the house has undergone a few small renovations, the kitchen in particular was starting to show its age and was in need of a makeover. The goal was to update the kitchen and give it a fresh new look while staying on a tight budget (~$300)

I will show you some before and after pictures, and walk you through the renovation process. A list of the total costs involved is included at the end. Enjoy!


Before Renovations


After Renovations


The use of two different colours for the cabinets was intended to (1) balance out the weight of dark colours contributed by the appliances, and (2) give the kitchen a unique touch with a fresh, modern, and overall eclectic feel.

Steps:
  1. Remove existing tile backsplash, make sure to wear gloves, mask, and goggles. If you are in an older house, make sure to check for asbestos. Asbestos used to be included in materials such as plaster, and can be carcinogenic when disturbed or airborne. Apply filler compound to any holes or blemishes, create a smooth surface. 
  2. Remove existing sink and faucet. Keep in a safe spot.
  3. Measure exisiting sink hole. This is important because you will need to use that            measurement for cutting the sink hole in your new countertop. 
  4. Remove old countertop. 
  5. My lovely father built my new countertop using plywood, contact cement, and laminate. 
  6. Use the measurements from Step 3 and cut the sink hole in the new countertop. 
  7. Install new countertop. 
  8. Reinstall original sink and faucet. The sink hole measurements must be exact or your sink will not fit properly. 
  9. Secure countertop to lower cabinetry. 
  10. Remove cabinet doors. 
  11. Clean cabinet doors. Make sure the cabinets are free of all grease and grime. Let Dry. 
  12. Sand the cabinets. Use a piece of 150 grit sandpaper and lightly sand all surfaces. This will allow the paint to bind to the cabinet surface. 
  13. Prime and Paint. 
  14. Drying time. It is very important to allow adequate drying time. I would suggest 5 days before reinstalling your cabinet doors. If you reinstall too early the paint will chip easily (e.g. rubbing against other doors) and will create more issues down the road. 
  15. Install cabinets and hardware. 
  16. Determine your tile layout. Mark the visual focal point for where your backsplash will be when complete; this will be your starting point for laying the tile. 
  17. Starting at the center of the focal point, start applying your thin set mortar to a small section of the wall using a trowel. Press and wiggle the tile into its appropriate location. Use a temporary 1/8" spacer to create a uniform grout line. 
  18. Complete tiling backsplash. 
  19. Let tiles settle overnight. Once dry remove spacers.
  20. Mix sandless grout and apply over the tile backsplash. Make sure to push grout into the gaps between the tiles. Remove any excess grout. 
  21. Allow the grout to set for an hour and clean the surface with a wet sponge. 
  22. Apply a bead of tile caulking along the bottom seam where the tile meets the backsplash. 
  23. Reinstall outlet covers. 
  24. Sit back and enjoy your new beautiful kitchen. 

Renovation Cost:

Subway Tiles: Olympia Tile = $30
Grout & Plaster= $30
Laminate: Formica= $65.00
Plywood: $55
Paint & Paint Supplies: $70
Contact Cement: $30.00
Misc Supplies: $30.00
Labor (my amazing Dad) : $15 in Tim Hortons Coffee…

Total cost of renovations:  $295

Let me know what you think! :)